

When you request a quote for vacuum forming services, do you always get responses that seem out of budget? Perhaps it's time to change your mindset. Shifting from "How much does this service cost?" to "How can we reduce costs together?" will transform you from a passive inquirer into a savvy buyer seeking maximum value.
The cost of vacuum forming isn't solely determined by the price of materials and labor. Up to 80% of the cost is locked in during the design and process planning stages. Understanding and optimizing these key aspects can reduce your overall costs by a staggering amount.
The following are practical strategies for significantly reducing the overall cost of vacuum forming from both a design and process perspective.
1. Design Optimization: Control Costs at the Source
Excellent design not only affects aesthetics and functionality but also directly determines the difficulty and cost of production. Minor adjustments to the drawings can potentially save you significant money on mass production.
Follow the Golden Rule of Draft Angle
Problem: Vertical or undercut sidewalls make demolding difficult, requiring more complex molds (such as sliders) or leading to increased scrap rates.
Solution: Design a draft angle of at least 3° for all sidewalls perpendicular to the parting plane. Every additional degree results in smoother demolding and higher yields.
Cost Benefit: Simplify mold structure, increase production speed, and significantly reduce scrap rates.
Control the "Drawing Ratio" and uniform wall thickness
Problem: Excessively deep drawing (high drawing ratio) leads to excessive sheet thinning, easily causing whitening or even cracking at corners, and places extremely high demands on equipment and processes.
Solution:
Use [Drawing Ratio = Depth / Width] to assess molding difficulty. Try to keep the ratio within 1:1; exceeding it significantly increases costs.
Prefer large radiused corners (R-angles) in design and avoid sharp corners. Rounded corners guide material flow evenly, preventing stress concentration and uneven thickness.
Cost Benefit: Achieving the required strength with thinner materials is possible, reducing material waste and improving yield.
Replacing Thick Material with Ribs
Problem: Increasing overall wall thickness to increase part strength leads to a proportional increase in material costs and prolonged heating and cooling times.
Solution: Cleverly designing ribs, wavy, or arched structures. Like building trusses, these structures maximize structural strength with minimal material.
Cost Benefit: Directly reduces material thickness requirements, shortens production cycles, and reduces part weight (which is also crucial for shipping costs).
2.Process and Mold Optimization: Making Every Penny Count
Once the design is finalized, process and mold selection become the primary focus of cost control.
Choose Mold Materials Wisely: Match Production Volume Requirements
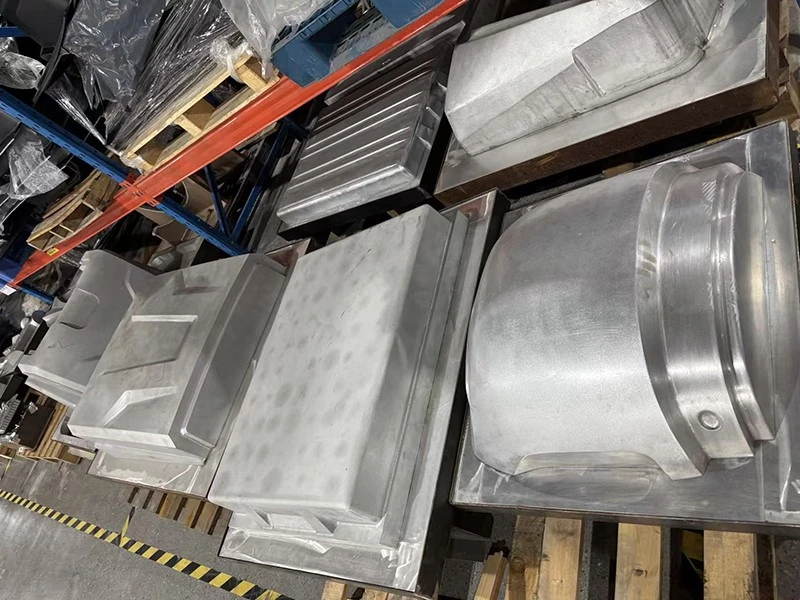
Misconception: Using Expensive Aluminum or Steel Molds Regardless of Production Volume.
Solution:
Prototypes & Small Batch (<100 pieces): Use wood substitutes/resin molds. These are extremely low-cost and have a fast production cycle, making them ideal for design verification and market testing.
Medium-volume production (100-5,000 pieces): Use high-strength resin molds or composite molds. These are moderately expensive and offer a lifespan far exceeding that of wood alternatives.
Large-volume production (>5,000 pieces): Invest in aluminum or steel molds. While the initial cost is high, their excellent thermal conductivity and long lifespan minimize the cost per piece during mass production.
Cost-benefit: Choose molds that are "just enough" for your project to avoid unnecessary initial investment.
Embrace "standardized" material sizes
Problem: A design requires a specific sheet size or color, requiring the supplier to order a specific size, resulting in additional initial order fees and inventory costs.
Solution: Proactively consult your supplier about standard sheet stock sizes and colors early in the design process. Whenever possible, make your design feasible by cutting standard sheets, and prioritize commonly used colors.
Cost-benefit: Reduce raw material procurement costs and lead times, avoiding high premiums for specialized materials.
Optimize layout and nesting

Problem: Placing only one part on a large sheet results in a significant amount of scrap.
Solution:
Multi-cavity molds: For small parts, multiple cavities can be created on a single mold base, allowing multiple products to be molded at once, significantly improving efficiency.
Smart nesting: Use software to optimize the arrangement of parts on the sheet, like putting together a puzzle, to maximize material utilization.
Cost-effectiveness: Directly increase output per production run and minimize scrap.
Collaborate with your suppliers early on.
Top tip: Don't wait until all designs are finalized to contact your supplier. Involve your vacuum forming service provider during the
conceptual design phase.
Cost-effectiveness: Their extensive experience can identify cost pitfalls and optimization opportunities in your design, preventing you from making mistakes and incurring costly revisions. The cost of a one-time design revision is far less than the ongoing waste during mass production.
All in all, Key points affecting vacuum forming costs
When designing: Keep draft angles in mind, control the depth-draw ratio, and utilize ribs.
When planning: Select molds based on production volume, prioritizing standard materials.
When collaborating: Make suppliers your design partners early on.
Reducing vacuum forming costs is a game of intelligence, not price-cutting. By optimizing design and process, you can not only achieve a more competitive price, but also a more efficient, stable, and high-quality product.
Bring your design sketches to a professional vacuum forming engineer today! You'll find that the potential for cost reduction is beyond your imagination.